Default Zone Management
When you first start a petrophysics project in Danomics, you will be asked to load/select the well header, formation tops, and well log information (more on data loading). Once you do this, when you click on a well the tops in that well will be used to establish the petrophysical zones for your analysis. This is the default behavior and requires no action on your part. An example of this is shown below for a project in the Powder River Basin
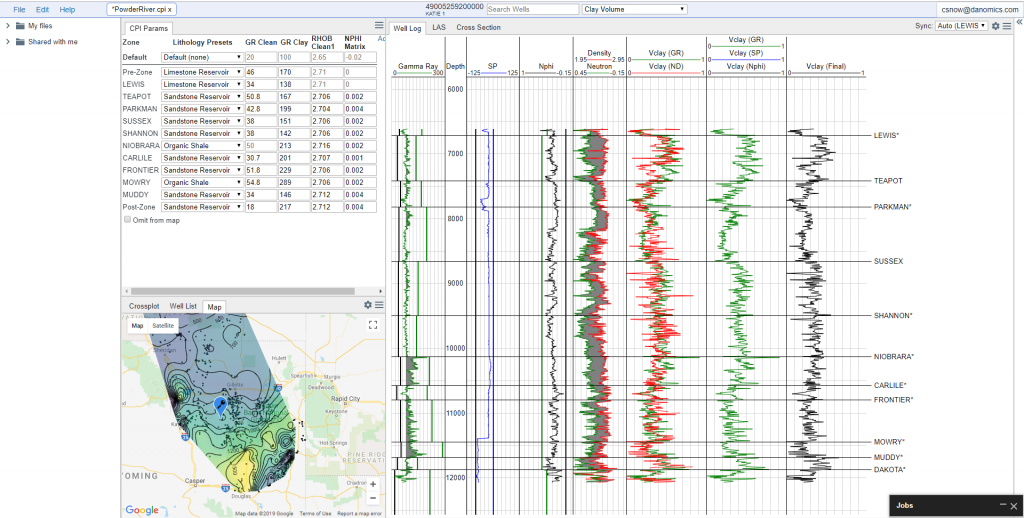
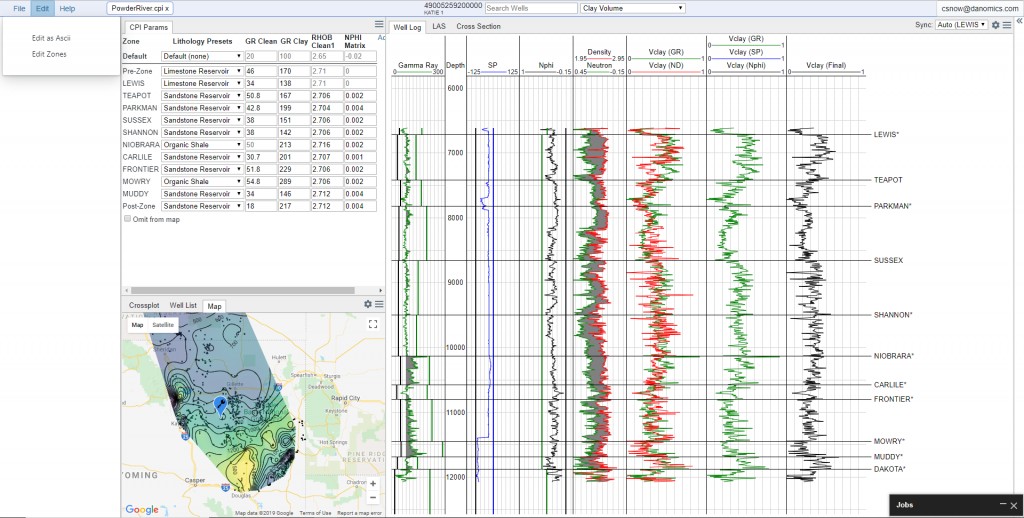
In the example shown above we have the automatically generated “Pre-Zone” and “Post-Zone”, which correspond to the portions of the well above and below the uppermost and lowermost tops, respectively. In this example, there are 11 imported formation tops, which means there are 12 zones that are available for parameter entry, interpretations, mapping, and export. If a top is absent from the strat column, the zone will expand to go to the next available top. For example, as shown the Parkman zone goes from the Parkman top to the Sussex top. However, if a well did not have the Sussex top picked the Parkman zone would go from the Parkman top to the Shannon top.
Although this allows for a full interpretation of the log, this may not be what you want/need for your project. For example, this would mean that maps of the Parkman zone would include (erroneously) the Sussex stratigraphy, which may result in large bulls eyes on maps. If you were only interested in getting out a petrophysical interpretation this behavior may be acceptable. However, in most cases users want zones to have consistent definitions. i.e., the Parkman always maps from the Parkman top to the Sussex top. This creates the need to use zone definitions.
What Zone Editor Does
Zone Editor allows you to define zones consistently across your project and to enable/disable zones. Example use cases for zone editor include:
- Reducing the number of zones that are displayed in the parameter entry table, zone list for maps, and that are exported in a CPI summary
- Allowing multiple tops to define the top or base of a zone, and in a designated order of priority.
- Handle changes in stratigraphy such as pinchouts, unconformities, and on-lapping.
- Changing the displayed name for a zone in the parameter entry table, maps list, and CPI summary.
Accessing Zone Editor
To access the Zone Editor, on the file menu select Edit > Edit Zones.
On selection, a pop-up window will appear with two options: (1) Compute zones automatically and (2) Manually specify zones. The former is selected by default, and is the standard behavior. The latter option is the focus of this article, and will allow you to define the top and base of each zone.

If you select the second option, you will have options to either “Add zone” or “Initialize form tops”. Normally it is quicker to “Initialize from tops”.

Clicking on “Initialize from tops” will take you to a second menu such as the one shown below.
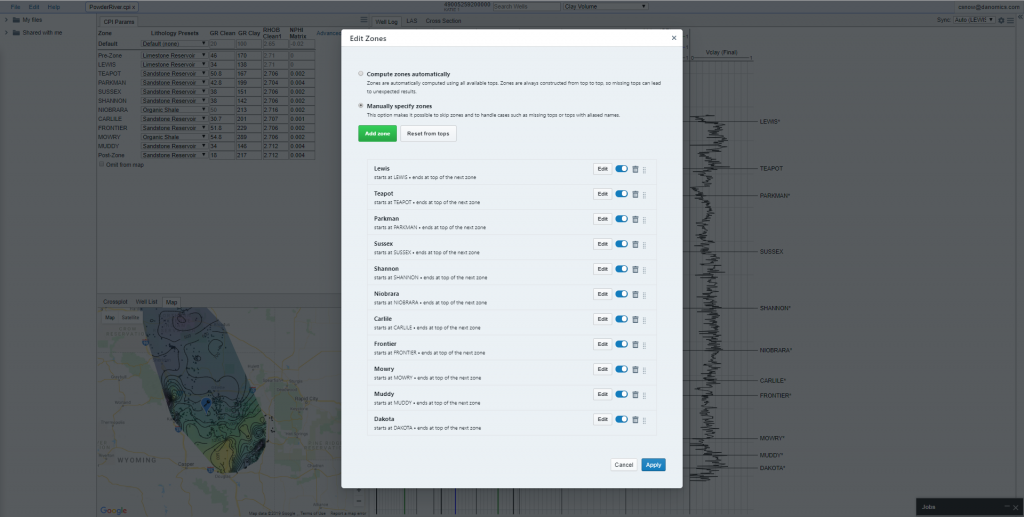
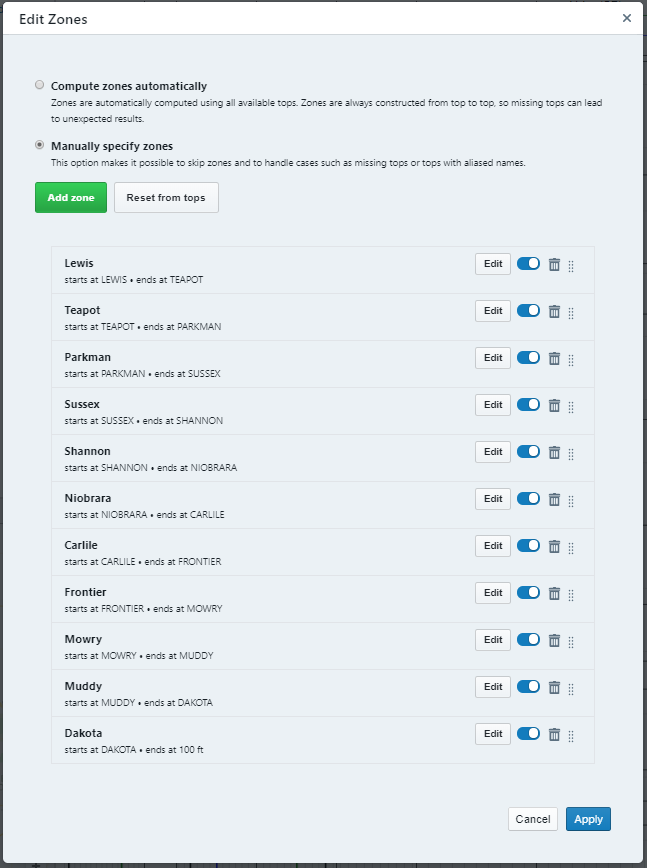
By default all of the zones will start at a top and will end at the top of the next zone. Using this option means that the software will still have the default behavior, but that you will have options to disable zones (by clicking on the toggle switch), delete zones (by clicking on the trash can icon), and rearrange zones (you can drag and drop zones by clicking on dots to the right and moving/down with mouse).
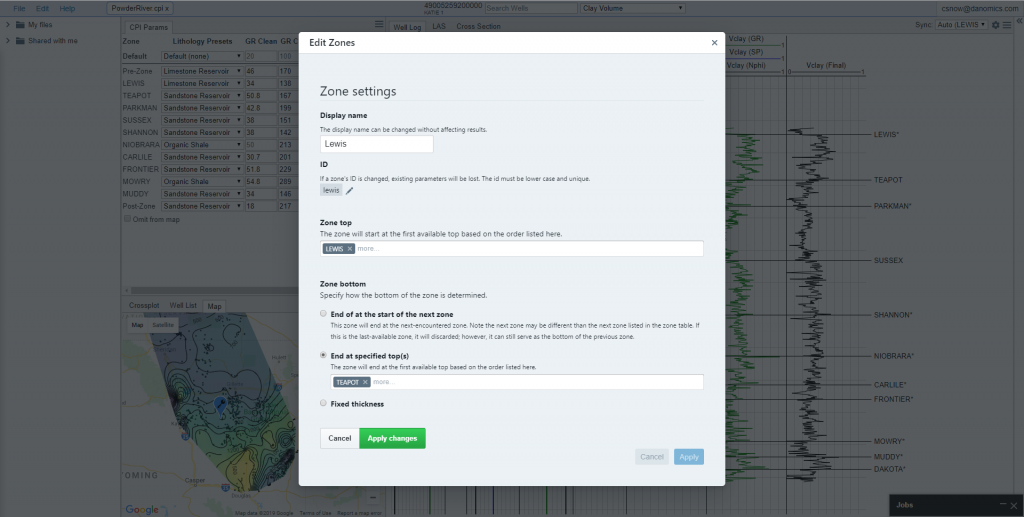
However, by defining zone tops and bases you will increase the control you have over your analysis, can customize the displays, and focus only on the zones that matter to your analysis. By clicking on the “Edit” button next to a zone you will be taken to an additional menu as shown below:

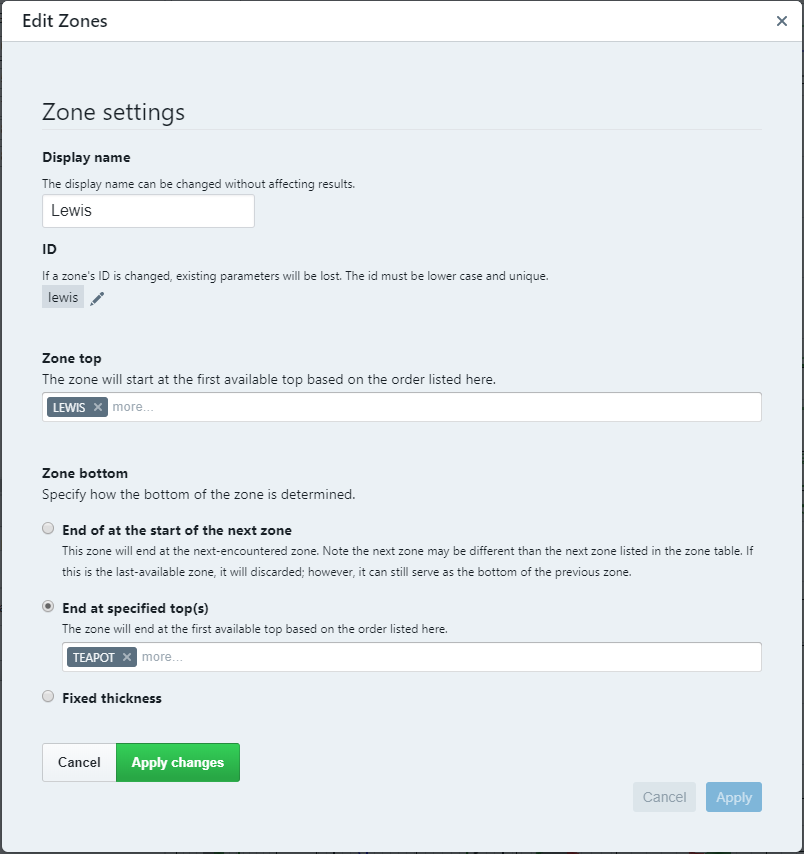
Now you will have the ability to change a zone’s Display Name, customize the tops used to define the top of the formation, and a series of options for defining the base of a zone. The default behavior is to “End at the start of the next zone”. However, in most cases the “End at a specified top(s) or “Fixed thickness” are likely more relevant.
By clicking on the “End at a specified top(s)” option you will now have a second selection box available that will provide you with a list of available tops, as shown below.
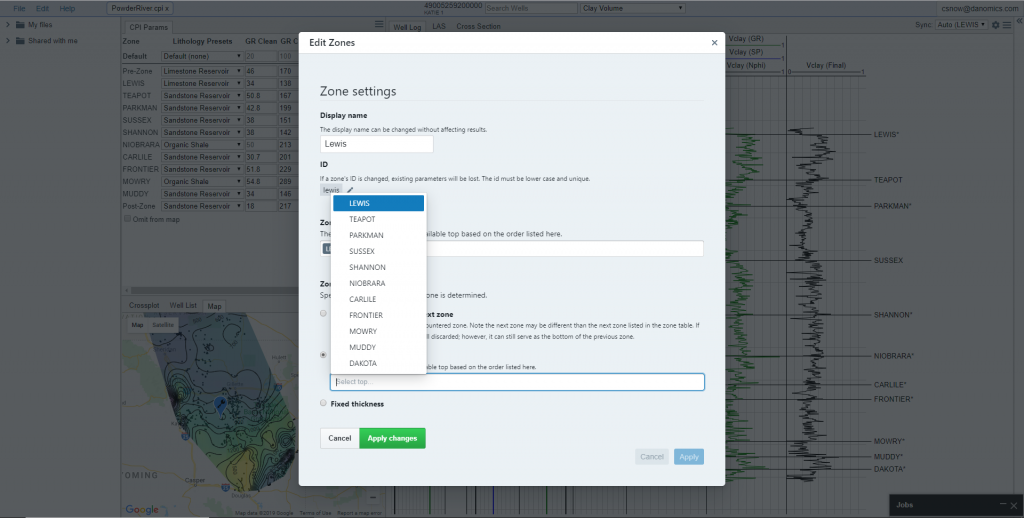
Once you select a top(s) it will show up in the list as a grey box with white text.
You can define the base via one top or via multiple tops. This will depend on your specific circumstances (more on this later).
In the example below, I have defined the top and base of each zone using a single formation top, and for the last zone I have used a constant thickness. You can see that in the description for each zone that it lists the top and base. For example, the “Lewis” zone starts at the “LEWIS” top and ends at the “TEAPOT” top. It there is no TEAPOT top picked in a well, the zone will not be available for interpretation/parameter entry. If a top is out of sequence a zone will also not appear. For example, if the Sussex top were incorrectly picked above the Parkman top, we would have the Teapot zone go from TEAPOT top to PARKMAN top, no Parkman zone, and then a Sussex zone from SUSSEX top to SHANNON top.
The options selected above mean that I now have a consistent set of zone definitions across my project. However, I may not want/need to analyze every zone at this point. For example, maybe I have entered in estimates for all of my zones, but I now only want to focus on the Parkman and Niobrara in detail. To do this, I would toggle off the other zones as shown below:
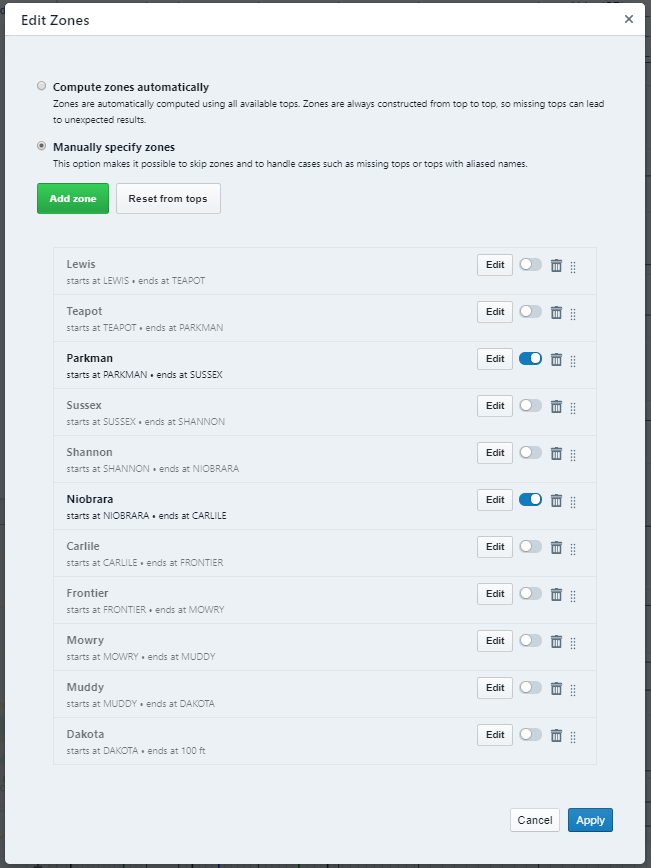
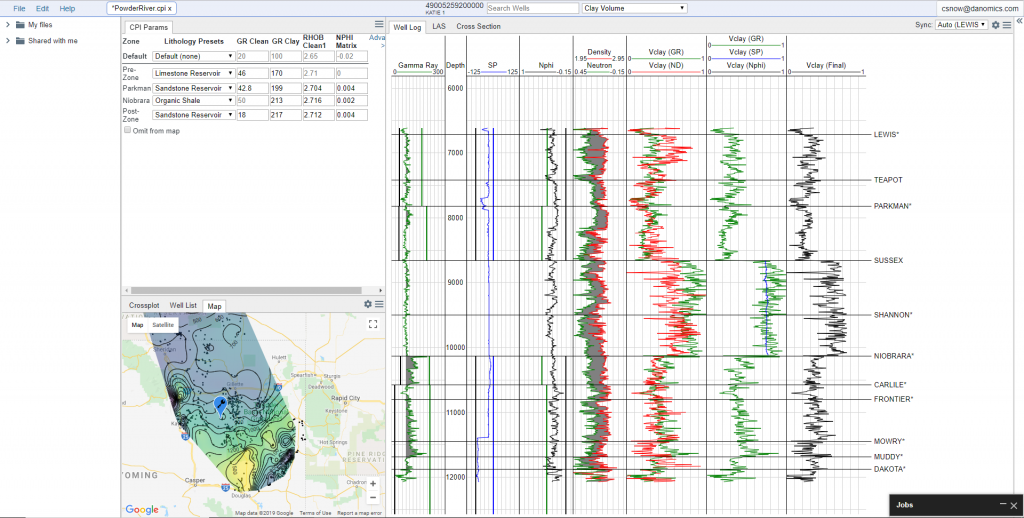
After I click on “Apply” I now only have the following zones present in my parameter entry table: Pre-zone, Parkman, Niobrara, and Post-zone. For mapping I only have the Parkman and Niobrara available.
Notice that the Pre-zone and Post-zone definitions have changed. Pre-zone is now defined as the portion of the log above the Parkman, while Post-zone is now defined as the portion of the log below the base Niobrara. If you were to activate, for example, the Mowry zone, the Post-zone definition would automatically adjust to be from the base Mowry to the bottom of the log. Changing the values of the Post-zone or Pre-zone will only affect those zones, and will not affect the parameters from zones that are not displayed.
A Word of Caution
Note that if you delete a zone it’s parameters will be permanently lost. If you change the zone ID (see below) you will lose the parameters you entered. However, if you change the zone ID back to its original name the original parameters will be available.
Specific Use Cases
Although there are several ways in which you can use Zone Editor there are a few common use cases that I specifically cover below as they are more common. I am presenting these only conceptually. Should you need help in implementing these, please contact us at support@danomics.com.
Tops from Multiple Interpreters
Imagine you had 3 geologists that had previously worked on an area (Bob, Tim, and Sam). They all had slightly different styles of picking tops, and you want to give preference to Bob’s picks, followed by Sam’s and Tim’s picks. Let’s say you had loaded Austin Chalk and Eagleford picks as follows: ASTN_bob, ASTN_tim, ASTN_sam, EGFD_bob, EGFD_tim, and EGFD_sam. The default software behavior would not be very useful in this case. Therefore we would use the Zone Editor. We would want to define the Austin Chalk zone as follows:
Zone top: ASTN_bob, ASTN_sam, ASTN_tim
Zone base: EGFD_bob, EGFD_sam, EGFD_tim
This tells the software “if Bob’s pick is available then use it, otherwise use Sam’s top if available, and if not, use Tim’s pick”. If no pick is available, then the zone will not be present. Now, let’s say that you picked the top Buda (which is below the Eagleford) in several wells and wanted to define the Eagleford zone. You would want to set the definition as follows:
Zone top: EGFD_bob, EGFD_sam, EGFD_tim
Zone base: Buda
Note that my top Eagleford definition exactly matches my base Austin Chalk definition. I do this because otherwise I risk having overlapping zones. And to avoid confusion, when zones overlap, only the uppermost zone is displayed.
Handling Stratigraphic Changes
Let’s imagine that we had an angular unconformity such as shown below, and are interested in mapping out the properties of “Layer D”
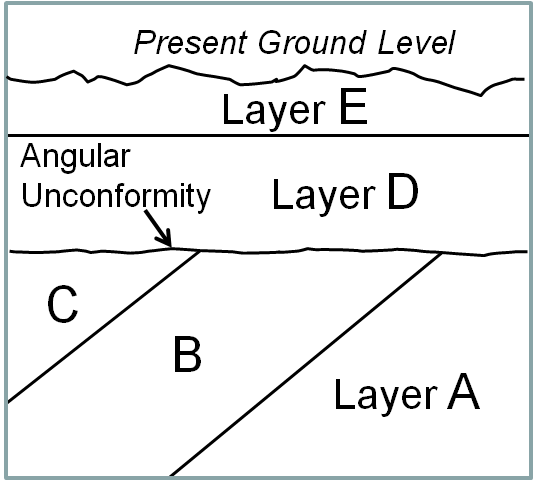
In this case if you drilled a well to on the left side of the diagram you would encounter tops for formations E, D, C, B, and A in that order, but if you drilled on the right hand side you would encounter only tops E, D, and A as the unconformity will have removed zones C and B. This affects how we want to define the base of Layer D. We would want to define the zone for Layer D as follows:
Zone Top: D
Zone Base: C, B, A
Notice that we define the base from youngest to oldest since this is an angular unconformity and we want to tell the software to “use top C as the base if present, otherwise try top B if present, and otherwise try top A”.
Combining Zones for Analysis
Interpreters often subdivide their primary zones into many different subzones.:
For example, let’s assume that the Niobrara has been subdivided into the A, B, C, D, and E benches. When performing your petrophysical interpretation you may want to only see the properties of all of the zones combined, or of certain combinations of benches combined if you believe that your completion might cross top picks (e.g., if you land a well in the Niobrara C, you may well frack up into the Niobrara B and A zones. Here are a few example setups for using subdivision:
Scenario: You want to view all zones as one:
Zone Top: Niobrara A
Zone Base: Carlile Shale
Scenario: You want to zones A and B together:
Zone Top: Niobrara A
Zone Base: Niobrara C
Scenario: You want to view all zones A and B together (Upper Niobrara), zone C by itself (Middle Niobrara), and have zones D/E together (Lower Niobrara), but disabled:
Zone Name: Upper Niobrara; Zone Top: Niobrara A; Zone Base: Niobrara C
Zone Name: Middle Niobrara; Zone Top: Niobrara C; Zone Base: Niobrara D
Zone Name: Lower Niobrara; Zone Top: Niobrara D Zone Base: Carlile Shale; toggle to disabled
Tips and Tricks
- Take the time at the beginning of a project to properly define a specified top and base for each zone – this will lead to more consistent outcomes.
- Disable zones instead of deleting them. This will keep your parameters and allow you to quickly/easily change what zones are visible.
- Do not change your zone ID unless absolutely necessary.
- If zones aren’t visible in the parameter list for a well, check if the zone is enabled/disabled. If enabled, check to see if there are overlapping zones.
- When using multiple tops to define a zone, try to ensure that the immediately adjacent zones also have consistent definitions.
- If you have a lot of zones and they are running off the page try using pressing the control and minus keys together as this will zoom out the browser, allowing you to see the full list.