There are currently seven basic data types that you are utilized within Danomics‘ Production Insights and Petrophysics Insights platforms. These are:
- Well log data. Well log data is currently accepted in LAS v1.2, v2.0 and v3.0 formats as defined by the Canadian Well Logging Society. Well log data is used in the Petrophysics Insights platform.
- Well header data. Well header information is currently accepted in both spreadsheet (MS Excel and csv) and IHS 297 formats (both comma delimited and fixed file formats). Well header data is used in both the Production Insights and Petrophysics Insights platforms.
- Well production data. Well production data is currently accepted in both spreadsheet (MS Excel and csv) and IHS 298 formats (both comma delimited and fixed file formats) . Well production data is used in the Production Insights platform.
- Formation tops. Formation tops can be uploaded in MS Excel or csv formats. Tops data is used in the Petrophysics Insights platform.
- Points data. Points data can be uploaded in MS Excel or csv formats. Point data is used in the Petrophysics Insights platform.
- Shape files. Shape files (.shp) files and projection information (.prj) are accepted. These files are used with the Mapping Essentials toolkit.
- Spatial tables. Spatial tables are Lat/Long/Value or X/Y/Value (with *.prj file) files that can be used for parameter interpolation (MS Excel and csv).
Uploading Data
In general, to upload data in the top left-hand corner of the software you will select “File” and then choose from the options upload options.
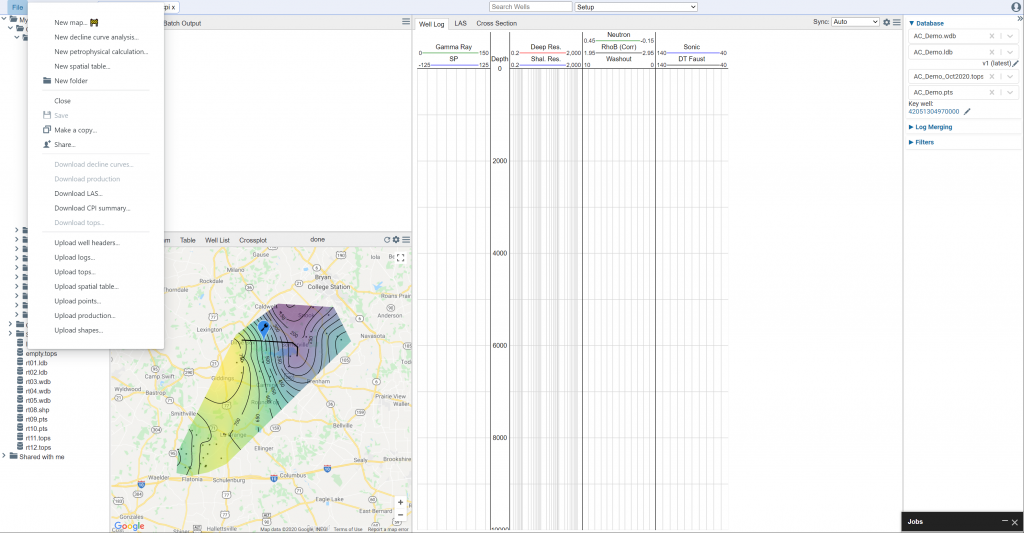
You can upload the data in any order. The data you need to upload will depend on the project type.
For a Decline Curve Analysis you will need to upload the well header data and well production data. For a petrophysical interpretation you will need to upload the well header data, well log data, and formation tops.
Well Header Data
To upload well header data go to File >> Upload well headers… and after clicking you will be presented with a dialogue box as shown below:
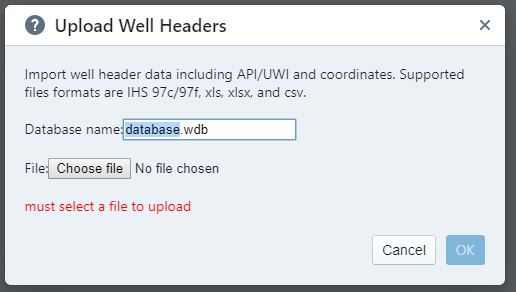
Once you are presented with this dialogue box, click on “Choose File” and then navigate to the file you want to upload. Once selecting the file give the database a name and click “OK”.
For IHS format files there are no additional steps. For MS Excel or csv file uploads you will need to match the column names in your file to the column names the program anticipates, as shown below.
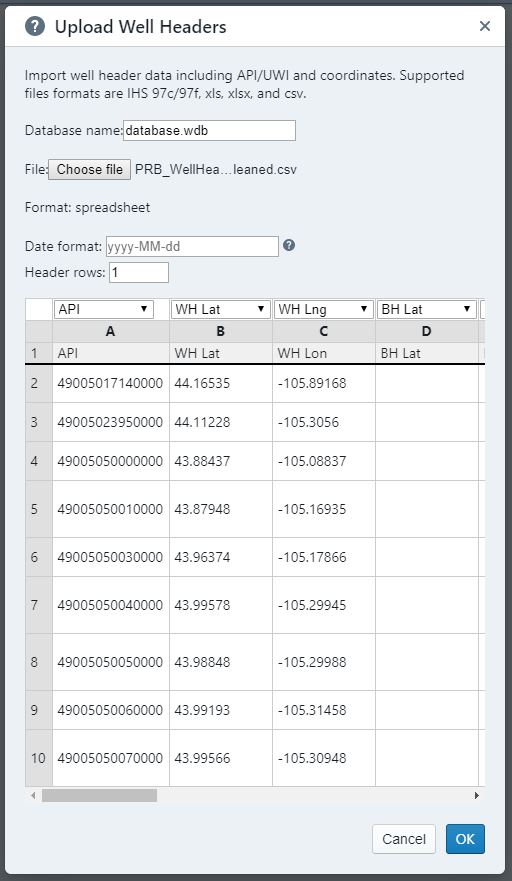
Options for columns that the program can utilize include the following:
- API Number (required)
- Well head latitude (required)
- Well head longitude (required)
- Bottom hole latitude
- Bottom hole longitude
- Formation
- County
- Operator
- Spud Date
- Elevation
- Elevation reference
- Lease name
- Well name
- Status
- Proppant Volume
If you have additional columns, you can choose “ignored” to have those skipped on the load. For spud date, you will need to select the import format.
Well Production Data Upload
Well production data can be uploaded both in IHS 298 and csv file formats. To do this select File >> Upload production… and after clicking you will be presented with a file selection dialogue. For IHS formatted data you will simply need to select the file and give it a name. For data in csv file formats, you will need to match the column headers to the data type expected by the platform, similar to how you do the selection with well header data. Column data types expected include:
- Oil production (by period)
- Gas production (by period)
- Water production (by period; optional)
- Days of production (during period; optional)
- Production record date
- API Number
Note that for production data you will need to indicate the reporting interval. Options include: Daily, Monthly, Quarterly, Yearly.
Well Log Data Upload
LAS files are uploaded as a zipped file format (*.zip). This reduces the upload time as files are often compressed by 90% or more. To do this in Windows, place your LAS files in a directory of your choosing. Navigate to that directory, select the LAS files you want to upload, and then right-click and select “Send To >> Compressed (zipped) folder”. Please ensure that there are only LAS files in your zipped folder as including other file types may lead to an error.
Once you have your LAS files in a zipped folder, Go to “File>>Upload Zipped LAS Files…” and then navigate to your zipped folder and select it. Give the database a name and click “OK”.
Note that for large numbers of LAS files it can sometimes take a few minutes to load (our benchmarking tests have shown that 2000 well logs may take up to 20-30 minutes). You can continue to work during this time as the job will process in the “Jobs” window on the bottom right of the screen. Do NOT close your browser while this is ongoing.
Please note that the UWI/API numbers in the LAS files should correspond to the UWI/LAS nubmers in the well header data files – this is how they are linked. Well logs provided by Danomics as well as most major vendors typically have the UWI included in the log header. If this is not the case, please contact us for help.
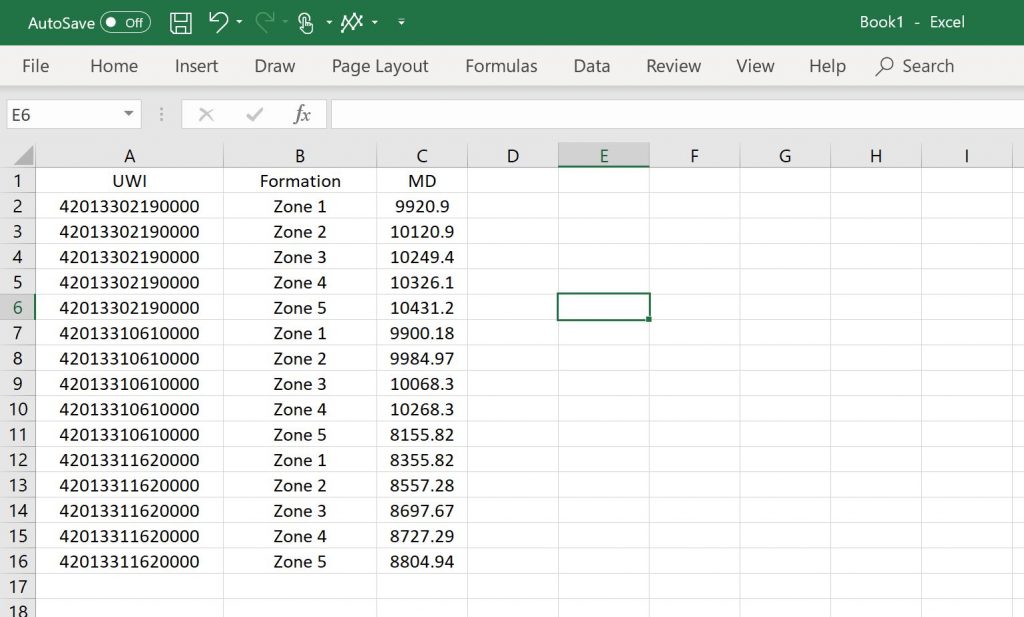
Formation Tops Upload
Formation tops can be uploaded via MS Excel file or as a csv file. The spreadsheet should contain information for UWI/API number, which matches the well header data and LAS data UWI/APIs, Formation name, and the depth of the top pick in measured depth:
When you select your file you will be presented with a pop-up dialogue which will present you with a list of your columns, which you should match to the corresponding property. This is shown in the screenshot below.
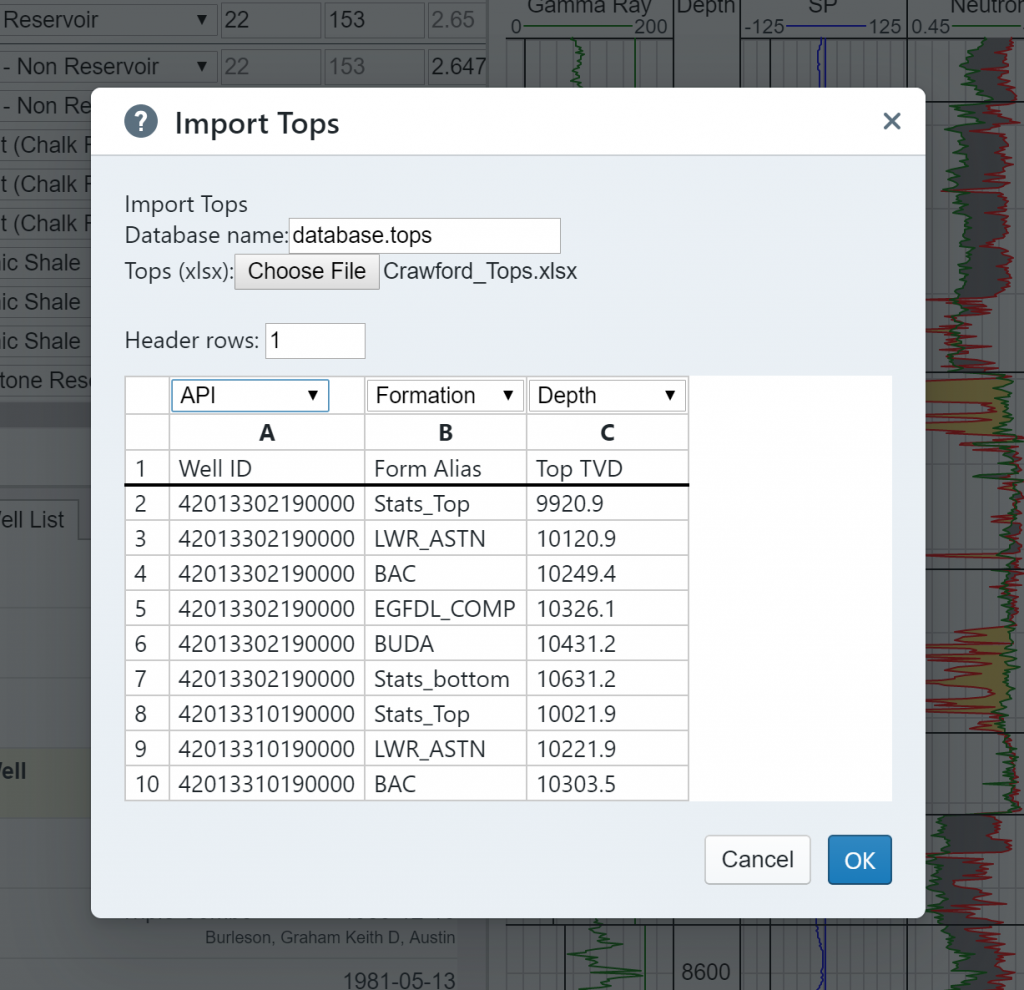
If you import additional columns you will need to label those accordingly with the “ignored” selection.
Points Data Upload
Points data includes all non-continuous data that is available for a well and associate with a specific depth. Core data is the most common example. You can use any column names or headers you want, but the program requires that API number be in the first column, and depth (MD) in the second column. Subsequent columns are for points data. To upload points data go to File >> Upload points…
An example file structure is shown below. In this example there are two wells (as indicated by API Number) and columns for TOC, Porosity, and Saturation.
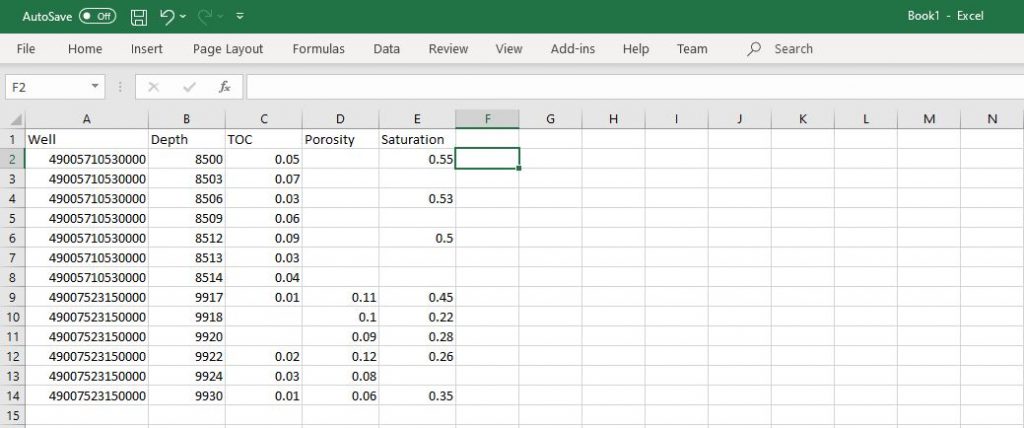
You can load data from as many wells with as many attributes as you want. Not all points are required to have all of the data.
Shape Files Upload
Danomics now accepts shape file formats. To upload a shape file, navigate to File >> Upload shapes… and select the file you want. You will have the option of selecting a project file (recommended) or selecting the coordinate units by name.
Tips & Hits
For project management we at Danomics often find it is easiest when the project and databases have the same names. For example, you may have an Eagle Ford shale project named EGFD.cpi with the database names: EGFD.wdb; EGFD.tops; EGFD.ldb.
The union (overlap) of data is what is displayed. For example, in a petrophysics project the union of the LAS files and the well header data file is what is displayed in the map and well list. If you are missing files, check to see if their UWI is present in both and of the same format/length.
If you are uncertain of why data is not displaying, clicking on the database name will bring up a summary dialogue. This dialogue will show you the API number plus other relevant information about that database. This provides users with a way to check and see if API numbers are in the same format across databases.
If you are having trouble loading your data, please contact us and we can help you get up and running in no time.